
BeagleBone Black (BBB) is a powerful and versatile single-board computer that will run major operating systems such as Linux and Android. It sports a 1 GHz CPU, 2GB on-board eMMC and 512MB DDR3, and has available a wide selection of peripheral cards called capes.

BeagleBone Black
In Part 1, I discussed the steps to download, configure and compile Ångström from source. In this article, I will describe how to flash a BBB with a pre-built Ångström image, or a custom-built image.
Flashing a Pre-Built Image
The Ångström distribution site offers many frequently-updated pre-built images. For most applications, one of the pre-built images should suit your need. But if you are adding new kernel drivers, then you will need to rebuilt the image from source. Let’s first look at how to flash a pre-built image.
Step 1 – Download a Pre-Built Image
The Ångström distribution site has many images to choose from. If you plan to boot from the uSD card, download an image with a Angstrom- prefix. If you plan to boot from the eMMC, then download the latest flasher image which has a BBB-eMMC- prefix. The difference between the two is that the flasher image is a bootstrap image that embeds in it another Linux image. First, the flasher image boots itself from the uSD card; once booted, it flashes the second image into the eMMC. Once the eMMC is properly flash, the uSD card can be ejected. The BBB boot mechanism is described near the end of this article.
Step 2 – Format the uSD card
Insert your SD card reader. If the card is already formatted, Ubuntu will automatically mount the card. If you are running Ubuntu on VirtualBox, you may have to first select your SD card device from the Devices->USB drop-down list in the menu bar to allow Ubuntu see the card reader. If the uSD card is already properly formatted, then skip to Step 3; otherwise follow the instructions here to reformat Linux expects two partitions: the first partition has to be a FAT partition holding the MLO and u-boot.img. A second EXT4 partition should the Linux partition, holding the root file system.
If you’re running an Ubuntu host, use the mkcard.txt script to format the uSD card, like below:
sudo ./mkcard.txt /dev/sdb
The above command assumes that the mkcard.txt is in the current directory, and that the SD card reader is at /dev/sdb. If you don’t know where the uSD card is, use the df command to find out:
larry@larry-VirtualBox:~$ df -h
Filesystem       Size  Used Avail Use% Mounted on
/dev/sda1        118G   88G   25G  78% /
udev             7.9G  4.0K  7.9G   1% /dev
tmpfs            3.2G  824K  3.2G   1% /run
none             5.0M     0  5.0M   0% /run/lock
none             7.9G  156K  7.9G   1% /run/shm
VirtualBoxShare  932G   91G  841G  10% /media/sf_VirtualBoxShare
/dev/sdb1         71M   56M   15M  80% /media/BEAGLE_BONE
/dev/sdb2        3.3G  1.2G  2.0G  37% /media/Angstrom
In the above example, the uSD card is at /dev/sdb, with the FAT partition at /dev/sdb1 and the Linux partition at /dev/sdb2.
Once the uSD card is properly partitioned and formatted, eject and reinsert the card reader to remount.
Step 3 – Flash the uSD card
(WARNING: Mistake in this step could wipe out your HDD, so be very careful with the device file and drive letter selection. Make sure you know where you’re writing to.)
If you are running Ubuntu (native, not on a VM), you can use the dd command:
dd if=my.img of=/dev/sdb bs=1M
where my.img and /dev/sdb can be replaced with your specific image file and SD card device, respectively. If you prefer to use a GUI based flash tool, try the Ubuntu USB Image Writer. To install it, do
sudo apt-get install usb-imagewriter gparted
sudo usb-imagewriter
If you’re running a Windows host, launch the Win32 Disk Imager. If you don’t have it already installed, download it from here.
(A special note for VirtualBox users: I ran Ubuntu under VirtualBox and found writing to SD card will hang up the VirtualBox, regardless whether dd or usb-imagewriter is used. Therefore I highly recommend VirtualBox users use the Win32 Disk Imager to write to the uSD card. Files can be transferred between Windows and Ubuntu via a shared folder. Instruction on how to set up the shared folder is available here).
Now you are ready to boot Angstrom follow the instruction in Booting the Image.
Flashing a Custom Image
If you followed Part 1 and built a custom image, the output files can be found in a directory that looked something like this:
./setup_scripts/build/tmp-angstrom_v2012_12-eglibc/deploy/images/beaglebone
The sub-directory, tmp-angstrom_v2012_12-eglibc may be named differently depending on the recipe you chose.
Flashing an image into the eMMC is a two-step bootstrap process. The flasher image boots from uSD first, then in turn flash a second image into the eMMC. You can download the latest flasher image from the same place you download the pre-built images. A flasher image has a BBB-eMMC-flasher- prefix. This link explains in detail how the flasher image works.
To see the content of a flasher image, use the kpartx command, like this:
unxz BBB-eMMC-flasher-v2013.06-2014.01.10.img.xz
sudo kpartx -a BBB-eMMC-flasher-v2013.06-2014.01.10.img
The first command line decompresses the file; the second creates two “loop” files, /dev/mapper/loop0p1 and /dev/mapper/loop0p2 that can be mounted. In this example, the two mount points are fat and linux:
sudo mount /dev/mapper/loop0p1 fat
sudo mount /dev/mapper/loop0p2 linux
Now you cd into each mount point and look at the files. You will find in the fat partition files like these:
ID.txt MLO u-boot.img uEnv.txt
and in the linux partition,
bin   build  eeprom.dump  home  lost+found  mnt   run   sys  usr
boot  dev    etc          lib   media       proc  sbin  tmp  var
The fat mount point contains the typical boot-loaders. The linux has a directory, build, unique to a flasher image. The build directory contains the actual image to be flashed into the eMMC. The directory contains files like these:
Angstrom-Cloud9-IDE-GNOME-eglibc-ipk-v2013.06-beaglebone.rootfs.tar.xz
beaglebg.jpg
connman.settings
mkcard.sh
MLO
u-boot.img
Again, we find the standard MLO, u-boot.img, as well as the root file system, Angstrom-Cloud9-IDE-GNOME-eglibc-ipk-v2013.06-beaglebone.rootfs.tar.xz. The beaglebg.jpg is the screen background, and can be replaced or modified to suit your need.
Okay, now let’s clean up after ourselves:
cd ../..
sudo umount linux fat
sudo kpartx -d -v BBB-eMMC-flasher-v2013.06-2014.01.10.img
Now that we know what a flasher image contains, how do we replace the embedded image with our own? It turned out the process is a little more complicated, and involves replacing the MLO, u-boot.img and root file system in the build directory with our own (the output image from Part 1), and update the MD5 checksum in the emmc.sh script. Koen Kooi offered a script, emmc-parepare.sh to do this, which I studied, annotated and modified to make it work for me. The modified script is as below:
#!/bin/sh

#----------------------------------------------------------------------
#  Assuming a file BBB-eMMC-flasher-v2013-06.img.xz exist
#
#  Usage:   sudo ./emmc-prepare.sh BBB-eMMC-flasher-v2013-06.img
#----------------------------------------------------------------------
IMAGE=$1

DEPLOYDIR="./build/tmp-angstrom_v2012_12-eglibc/deploy/images/beaglebone"
MOUNTPOINT="/media/2"
MOUNTPOINT1="/media/1"
FLASHIMG="Angstrom-Cloud9-IDE-GNOME-eglibc-ipk-v2012.12-beaglebone.rootfs.tar.gz"
SCRATCHDIR="/home/larry/build"

#----------------------------------------------------------------------
#  in-place eMMC flashing script that BBB will run after booting the
#  flasher image
#----------------------------------------------------------------------
EMMCSCRIPT="./sources/meta-beagleboard/contrib/bone-flash-tool/emmc.sh"

#----------------------------------------------------------------------
#  DATE looks like:
#
#  2014.0108-DO-NOT-USE-FOR-PRODUCTION
#----------------------------------------------------------------------
#DATE="$(ls -o  --time-style +' %Y.%m.%d' ${DEPLOYDIR}/${FLASHIMG} | awk '{print $5}')-DO-NOT-USE-FOR-PRODUCTION"
DATE="$(date +'%Y.%m.%d')-DO-NOT-USE-FOR-PRODUCTION"

echo "Using ${DATE} as identifier"

IMAGENAME="$(basename ${IMAGE} .img)-${DATE}.img"

echo "IMAGENAME = ${IMAGENAME}"

if ! [ -e ${IMAGENAME} ] ; then
        echo "uncompressing image"
        xz -k -d -v -c ${IMAGE}.xz > ${IMAGENAME}
fi

if ! [ -e ${IMAGENAME} ] ; then
        echo "${IMAGENAME} not found!"
        exit 1
fi

echo "Trying to attach image file"
LOOPFILE="$(kpartx -a -v ${IMAGENAME} | grep /dev | grep p2 | tail -n1 | awk '{print $8}' | sed s:/dev/::)"

echo "Loopdev: ${LOOPFILE}"

sleep 1

if ! [ -e /dev/mapper/${LOOPFILE}p1 ] ; then
        echo "Incorrect partitioning, /dev/mapper/${LOOPFILE}p1 not found"
        exit 1
fi

if grep -q "${MOUNTPOINT1}" /etc/mtab ; then
        echo "${MOUNTPOINT1} already mounted, trying to unmount"
        umount ${MOUNTPOINT1}
fi

echo "Mounting /dev/mapper/${LOOPFILE}p1"
mount /dev/mapper/${LOOPFILE}p1 ${MOUNTPOINT1} || exit 1

echo "BeagleBone Black eMMC flasher ${DATE}" > ${MOUNTPOINT1}/ID.txt

sleep 3

umount ${MOUNTPOINT1} || exit 1

if ! [ -e /dev/mapper/${LOOPFILE}p2 ] ; then
        echo "Incorrect partitioning, /dev/mapper/${LOOPFILE}p2 not found"
        exit 1
fi

umount ${MOUNTPOINT}

echo "Mounting /dev/mapper/${LOOPFILE}p2"
mount /dev/mapper/${LOOPFILE}p2 ${MOUNTPOINT} || exit 1

echo "Tarring up the contents"
( cd ${MOUNTPOINT} && rm -f build/Angstrom-*.rootfs.tar.* && tar cf ${SCRATCHDIR}/flash.tar . )

sleep 3

umount ${MOUNTPOINT} || exit 1

echo "Zeroing /dev/mapper/${LOOPFILE}p2"
dd if=/dev/zero of=/dev/mapper/${LOOPFILE}p2

echo "Creating ext4 on /dev/mapper/${LOOPFILE}p2"
mkfs.ext4 -L eMMC-Flasher /dev/mapper/${LOOPFILE}p2 || exit 1

echo "Mounting /dev/mapper/${LOOPFILE}p2 again"
mount /dev/mapper/${LOOPFILE}p2 ${MOUNTPOINT} || exit 1

echo "Untarring contents again"
tar xf ${SCRATCHDIR}/flash.tar -C ${MOUNTPOINT}

echo "Copying over bootloader and tarball"
cp -vf ${DEPLOYDIR}/MLO ${MOUNTPOINT}/build/ && cp -vf ${DEPLOYDIR}/u-boot.img ${MOUNTPOINT}/build/ && cp -vf ${DEPLOYDIR}/${FLASHIMG} ${MOUNTPOINT}/build/

echo "Copying over flashing script"
cp -vf ${EMMCSCRIPT} ${MOUNTPOINT}/usr/bin/

rm -f ${MOUNTPOINT}/build/emmc.sh

MLOMD5="$(md5sum ${DEPLOYDIR}/MLO | awk '{print $1}')"
UBOOTMD5="$(md5sum ${DEPLOYDIR}/u-boot.img | awk '{print $1}')"

sed -i -e s:DATE:${DATE}:g \
       -e s:MD5MLO:${MLOMD5}:g \
       -e s:MD5UBOOT:${UBOOTMD5}:g \
       ${MOUNTPOINT}/usr/bin/emmc.sh

sync && sleep 1

echo "Ummounting ${MOUNTPOINT}"
umount ${MOUNTPOINT}

sleep 1

echo "detaching loopfile"
kpartx -d -v ${IMAGENAME}

echo "Compressing image"
#xz -f -v -z -T0 -e -9 ${IMAGENAME}
#cp -f ${IMAGENAME}.xz /build/dominion/beaglebone/${IMAGENAME}.xz
The DEPLOYDIR points to the output directory of the new Ångström build from Step 5. MOUNTPOINT and MOUNTPOINT1 are temporary mount points used by the script to mount the flasher image while the script is executing. FLASHIMG is the name of the image. I also commented out the last two line, which re-compress the *.img, since the flashing step, whether it’s using dd or Win32 Disk Imager, expects a *.img file as input.
Step 1: Prepare emmc-prepare.sh
The first step is the copy the script above and save it as setup_scripts/emmc-prepare.sh. Edit this file to point the macros to the appropriate places, and then make it an executable:
chmod +x emmc-prepare.sh
Step 2: Run the script
Next we run the script in the setup_scripts directory, like this:
sudo ./emmc-prepare.sh BBB-eMMC-flasher-v2013-06.img
I want to highlight that, while the script’s command line argument is a file name ending with *.img, the script is expecting to find a file under the same name but with a *.img.xz extension. I commented out the last two lines of original script, as they are unnecessary. The script above should take about 1-2 minutes to run.
(Note: After my script modification, I found that a version of emmc-parepare.sh and other scripts, also exist under the /setup_scripts/sources/meta-beagleboard/contrib/bone-flash-tool directory; however, I find these script not directly usable without the kind of modification I made)
Finally, flash the *.img file outputted from the script to a uSD card by following Step 3 of Flashing a Pre-Built Image.
Booting the Image
To boot the image from uSD card, make sure the BBB is powered off, with nothing connected to it, except maybe the HDMI cable. Hold down the User Boot button above the uSD card slot while inserting a 5V power supply with at least 1A capability (I use a 5V@2.5A wall wart). USB power is insufficient for flashing, so don’t even both to try. Continue to hold down the button until the four User LEDs are all lit up, and the flashing in varying patterns. The flashing process will last about 45 minutes–if successful, all four LEDs will light; if failed, all four will dim.
(Note: when I updated my beaglebg.jpg, even kept the same file name, the BBB flashing ended with the User LEDs showing failure (all dimmed) even through the image was successfully flashed. I know it was successful because I was able boot from eMMC and see the new image running with the new background. I reckoned there is another checksum being verified somewhere during the boot process that included the background image.)
If flashing is successful, connect the BBB to a LCD monitor using a HDMI cable to see the beautiful Ångström IDE. Yes, after all this work, a simple IDE looks beautiful.
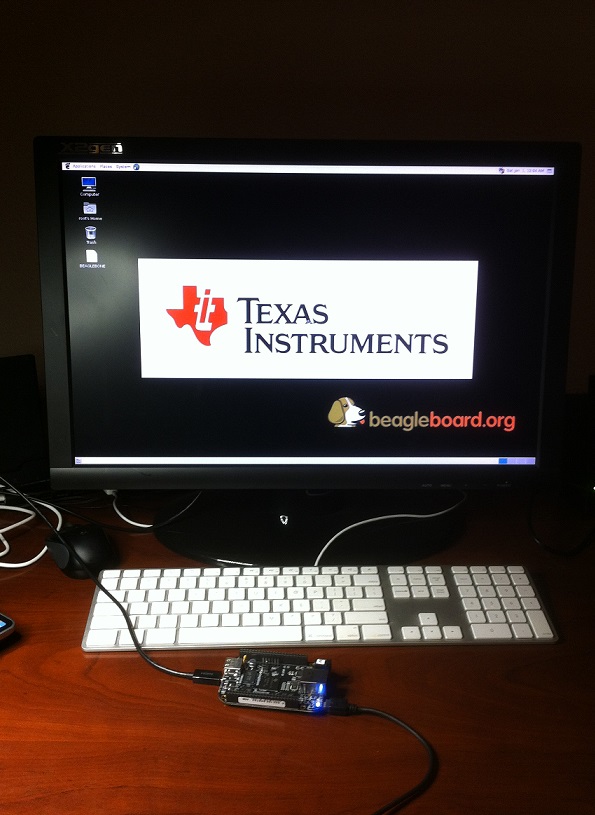
BeagleBone Black booted (custom background shown).
Summary
BeagleBone Black with Angstrom is a powerful embedded platform for many different applications. The goal of this two-part article is to enable developers to quick bring up the platform so the creative process can begin. In Part 1, I discussed how to compile Angstrom from source; and in Part 2, I described in detail how to flash and boot the image. I hope you find this article useful. I would love to get ping back from you, and would be happy to answer any questions about the steps.
Further Reading:
- BeagleBone Black Wiki by Gerald Copley
- BeagleBone software update by crashcourse
- SDCard formatting for BeagleBoard/BeagleBone
(The above article is solely the expressed opinion of the author and does not necessarily reflect the position of his current and past employers)